I purchased a subscription to Office 365 in order to have my own e-mail addresses using my domains. The problem is I don’t want just one e-mail address, but two. Since Microsoft shifted toward user based subscriptions, it should be perfect! I should only have to pay once… Well, it’s a little more complicated than that. The easiest way would be to pay two subscriptions; but I don’t understand why I should have to do this since I am the only user.
The goal
- Receiving messages on more than one e-mail address
- Sending messages from different “From” e-mail address
The main reason being if you own two different companies (most likely 2 different URL domains), you don’t want to mix their messages together, and you don’t want to send a message from the wrong company’s e-mail address.
The pitfall is the easy “Alias.” On some hosts, they call this a “Forwarder.” This is great if you are trying to reach goal number 1. All messages will end up in a unique and simple mailbox. However, you won’t be able to send e-mail messages from that alias. Outlook or OWA will let you try it, and… nope, it won’t work.
Creating a shared mailbox
“Shared Mailbox.” Doesn’t it sound obvious? The name comes from using a mailbox with other colleagues, but in our case, we will create a shared mailbox for ourselves.
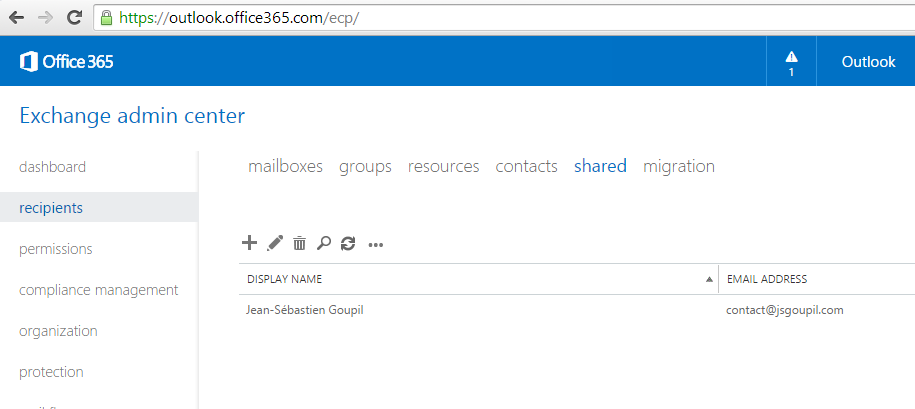
You can go through the “Admin” section on outlook.com/yourdomain.com, but there is a better way. Your subscription might have an “Exchange Admin Center” link; but mine doesn’t, so you have to know this awesome URL to better control your subscription:
https://outlook.office365.com/ecp/
From there, create a shared mailbox by clicking “Recipients”, “Shared”, then “New”.
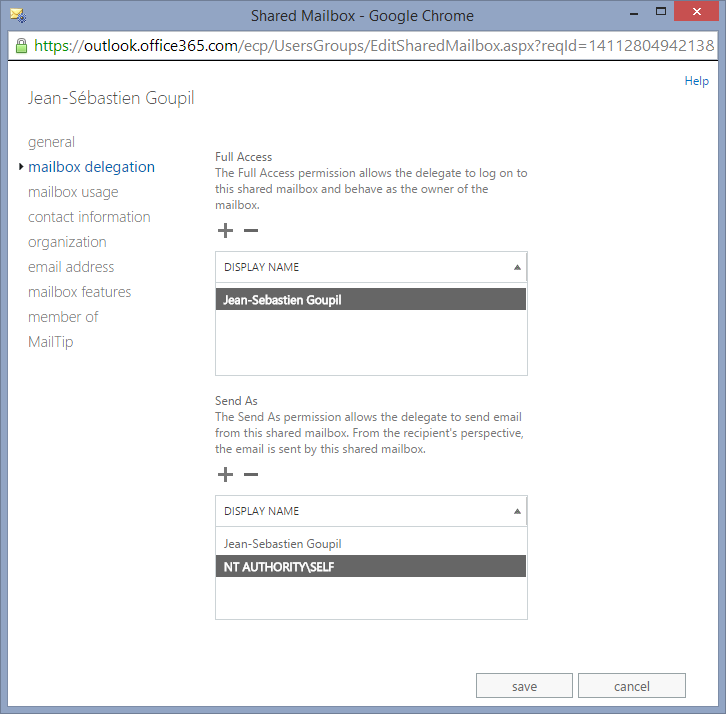
If you double click on that new mailbox, you can change the settings for the “Mailbox Delegation.” Add yourself (primary e-mail address) for “Full Access” and “Send As.”
Powershell
If you manage to create these mailboxes, you can skip this section. Otherwise, you can run these commands in an Elevated Powershell to control your mailbox. Run ONE command at a time; some commands have following questions as you run them.
|
1 2 3 4 5 6 7 8 9 10 11 12 13 |
Set-ExecutionPolicy Unrestricted -Force $LiveCred = Get-Credential $Session = New-PSSession -ConfigurationName Microsoft.Exchange -ConnectionUri https://ps.outlook.com/powershell/ -Credential $LiveCred -Authentication Basic -AllowRedirection # If the mailbox exists Set-Mailbox second@email.com -Type shared # If the mailbox doesn't exist New-Mailbox -Shared -UserPrincipalName second@email.com # Assign permissions Add-MailboxPermission -Identity second@email.com -User primary@email.com -AccessRight FullAccess -InheritanceType All -Automapping $false Add-RecipientPermission "second@email.com" -Trustee primary@email.com -AccessRights SendAs |
Source: http://technet.microsoft.com/en-us/library/aa997663(v=exchg.150).aspx
Configuring OWA
Adding the Shared Mailbox
From OWA, you can open a new mailbox and keep two tabs open to watch your e-mail messages come in. However, it’s a lot nicer to have everything in one place.
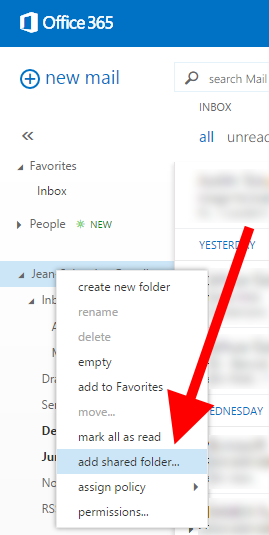
Right click on your existing mailbox in the left menu, then click on “add shared folder…” Type your second e-mail address and voilà! You get your shared mailbox right into your main view.
Drag and drop the shared mailbox inbox to your favorites. (There is currently a bug I reported to Microsoft, you can’t have 2 folders named the same thing in your favorites as of 9/21/2014)
Configuring From
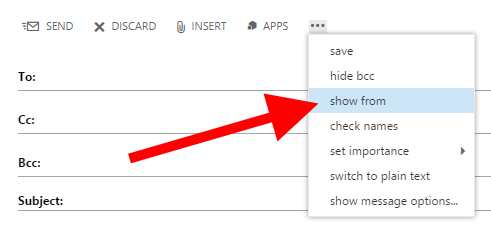
Create a new message, then click on the ellipses, then “Show from.” You can now enter the shared mailbox e-mail address and send messages as your second company!
Configuring Outlook 2013
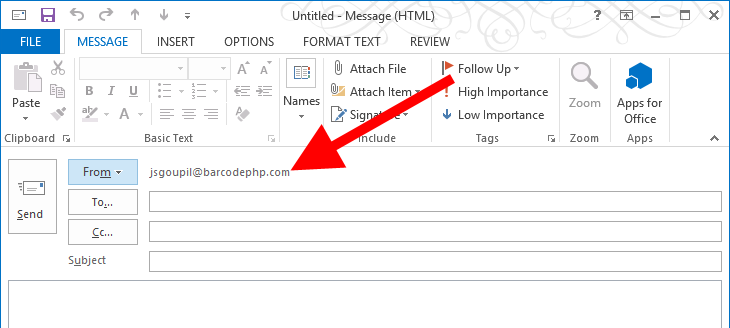
If you created everything from the web and imported your main e-mail address in Outlook 2013, everything should work just perfectly – minus one single detail. If you go inside your Shared Mailbox Inbox then click “New Email,” you end up with your primary e-mail address in the “From” field.
You might think that’s not a big deal, but you will end up forgetting to change that setting every time you write a message. There is a trick to fix this. We will delete the shared mailbox from Outlook, then re-add it manually.
Set the AutoMapping of the shared mailbox e-mail address to false with Powershell.
|
1 2 3 4 5 |
Set-ExecutionPolicy Unrestricted -Force $LiveCred = Get-Credential $Session = New-PSSession -ConfigurationName Microsoft.Exchange -ConnectionUri https://ps.outlook.com/powershell/ -Credential $LiveCred -Authentication Basic -AllowRedirection Add-MailboxPermission -Identity second@email.com -User primary@email.com -AccessRight FullAccess -InheritanceType All -Automapping <span style="color: #ff0000;">$false</span> |
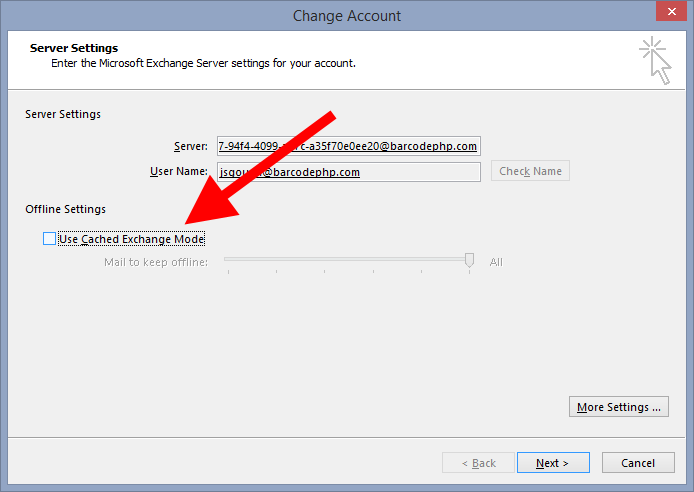
Outlook caches the mailboxes. To remove caching temporarily, click “File”, “Account Settings”, “Account Settings.” Then double click on your primary e-mail address, then uncheck the box “Use Cached Exchange Mode.”
Restart Outlook. If the shared mailbox didn’t disappear, wait a few seconds, and restart Outlook.
Once the mailbox has disappeared, let’s add it manually from the “File”, “Add Account” menu.
Enter your name, shared mailbox e-mail address, then the password of the primary e-mail address. A credential window will popup. Enter your primary e-mail address and password.
You should be done! Oh wait – go set your cache settings back to normal! Your mom won’t approve of you using that much bandwidth.
Now when you are in the shared mailbox inbox, creating a new message will have the correct “From” e-mail address.
This technique has been given to me by Microsoft support; I was actually impressed at the representative’s level of knowledge on the product. Do you need to give Microsoft feedback about Outlook Web Access? Use this URL: http://mymfe.microsoft.com/Microsoft%20%20Online%20%20Services/Feedback.aspx?formID=210

